Tag

tutorial

How to create links to Google Docs files

By Blog, Video

If you do a lot of work in Google Docs, there are times when you may want to create links to Google Docs files so other people can view or edit them. Sharing public links in Google Docs is easy to do, but the menu is buried and some of the options can be a little confusing. In addition, sometimes you may want to add restrictions to limit who can view the Google Docs file or who is allowed to edit the file. These are important considerations if you are collaborating using Google Drive or Google Docs.

The following 3-minute video explains how link sharing works for Google Docs. It covers both public links (viewable by anyone) as well as private links (limited to people you contact or people in your company):

How to embed Google Forms on WordPress or other sites

By Video

In recent months, I have talked about how to create a Google Form and how to change the design. If you use Google Forms to make surveys, scheduling forms, or other online data-entry pages, you may prefer to simply email the Google Forms URL to users or post it on social media. However, there is another way to use Google Forms, that lets you embed Google Forms on WordPress or another type of website. It can be used for all kinds of websites, including corporate websites and WordPress blogs.

There are several advantages of embedding a Google Form on your own website:

  1. The web browser will show your web domain (e.g., in30minutes.com) instead of the Google Forms URL.
  2. You can leverage the branding you may have on the website, such as logos or links to other resources.
  3. Other people may be more likely to use the form if it comes from a trusted source, such as your business URL or an official brand URL.

In order to embed the form on a website, the website will need to allow HTML to be added to a specific page, and you (or someone who has access to the content management system of the website) has the ability to add a line of computer code. This is important, because not all websites allow such access, or you may not know how to do this. However, if you manage your own website or blog, and you are comfortable with copying and pasting, it’s not hard to place Google Forms on WordPress or another type of website.. The following short video shows how, using a WordPress business website as an example.

How to prevent messages from going to the Gmail spam folder

By Video

If you are one of the hundreds of millions of people who use Gmail every day, you may be wondering how to stop messages from certain people or organizations being flagged as spam and placed in the Gmail spam folder. It happens to me all of the time, sometimes with important messages from friends or colleagues or business partners. Even if you use Gmail’s “not spam” button, sometimes the messages are still flagged as spam (false positives) and end up in the Gmail spam folder. After a certain period of time, the messages are automatically deleted — sometimes without you ever knowing they were there!

The video below shows how to stop gmail from flagging spam for email addresses that you choose. In other words, these messages won’t end up in the Gmail spam folder. The video is short, just a few minutes long, and the technique works with the standard consumer version of Gmail as well as the G Suite/Google Apps flavor of Gmail.

Google Forms new interface and tutorial

How to make a form using the new Google Forms

By Video

I always thought that Google Forms was one of the great, hidden features of the Google Drive/Google Docs suite. Not only did it let users quickly create an online survey form that could be sent to people or inserted into a webpage, the responses were automatically fed back into Google Sheets for sorting and other actions. I wasn’t the only one who was impressed; soon enough I began to see all kinds of other uses of Google Forms, from small businesses setting up appointments to online surveys for startups researching market trends.

Now there is a new Google Forms interface. It is superior to the old interface, looks better, and allows for quicker form creation and data review. As before, Google Forms is free, and in that sense provides a great alternative to Survey Monkey, which locks up some features behind a paywall. While Microsoft’s free online spreadsheet program Excel Online offers a new form creation tool, the interface is positively primitive compared to Google Forms.
Google Forms interface and tutorial

In the short video below I won’t get into all of the details of the new Google Forms interface, but it shows how to set up a basic form. I have also created another video that shows how to change the design of Google Forms.

Google Forms tutorial using the new forms interface

By Blog

I recently tried out the new Google Forms while writing an update to Google Drive & Docs In 30 Minutes. The new interface is a lot slicker than the old version of Google Forms, and gives more control over the look and feel of the forms. It’s a great way to create an online survey, or have people enter data for a variety of purposes. It’s also worth noting that Google Forms has been partially decoupled from Google Sheets, meaning it’s possible to create a form directly from Google Drive and see the results within Google Forms, instead of having to open up Google Sheets. This post will show what the new Google Forms interface looks like, and then give a brief Google Forms tutorial.

Google Forms is a tool to build online forms, which can then be emailed, shared on social media, or embedded on a public-facing website. The forms can really change the way you gather data. Think about it: Instead of manually entering data, you can make a simple form or survey, post it on the Web and let other people do the work for you! This tool is perfect for signup forms, surveys, and simple reporting.

Once a form has been created, it can be accessed via a Google link that you can email or post on a social network. The form can also be embedded on a blog or company Web page. Customization options can make the form look more professional, or match the fonts and colors you want to use. The data from the form is only visible to you and designated collaborators (as described in ).

The Google Forms tutorial below applies to the updated interface for creating new forms, which was rolled out in late 2015 and early 2016 for some users. I expect it will be rolled out to most Google Drive and Docs users later in 2016.

How to create a form

  1. You can either use an existing spreadsheet (select Tools > Create a form) or make a new form from Google Drive’s main screen by pressing the New button and selecting More > Google Forms.
  2. The form editor appears (see screenshot, below).
  3. Enter the title.
  4. Enter the description. Make it clear what the form is being used for, and add any instructions that can help people complete the form. Absent context or appropriate instructions, users may be reluctant to use the form, or they may enter the wrong type of data.
  5. Edit the first untitled question. Change the name of the question by clicking on the title. Change option labels by clicking on them. Select different question types from the drop-down menu labelled Multiple choice. Select Required to force users to answer a question.
  6. Add a new question using the Add question There are more than a half-dozen types of questions that can be used.
  • Short answer. A one-line text field.
  • Paragraph. Allows for longer answers.
  • Multiple choice. Create a multiple-choice question, with as many possible answers as you want.
  • Checkboxes. People can check off one or more items from a list.
  • Dropdown. Creates a drop-down menu.
  • Linear scale. Users choose from a range of numbers.
  • Multiple choice grid. Users fill in data according to a table.
  • Date or Time. Users can select the date or time (useful for scheduling purposes).
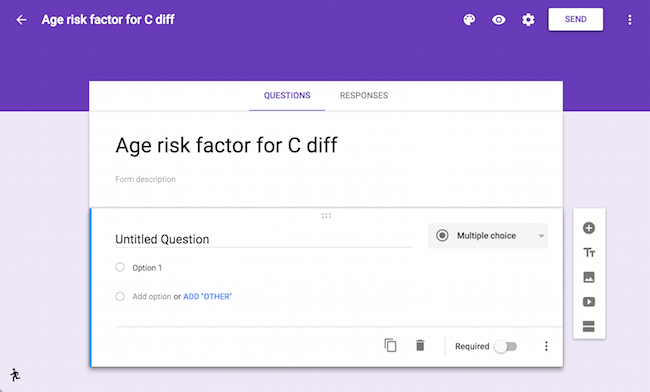
Google Forms tutorial based on the new Google Forms interface

The form builder has additional functions:

  • Icons allow form creators to add titles, sections, photos, and video.
  • Change the colors used in the form by clicking the easel icon.
  • Preview the form by clicking the eye icon.
  • The settings icon (look for the gear) controls who can use the form, as well as presentation options. Use the drop-down menu to select Anyone or one of the other options, if available.

When complete, click the Send button, which shows various distribution options. Email is the default choice, but social media icons, Web links, and embed code (which can be used to insert the form into a blog post) are other possibilities.

Data entered into the Web form can be accessed via the Responses tab at the top of the form editor. Click the Sheets icon to flow the data into a new or existing spreadsheet, which can then be formatted, sorted, filtered and otherwise manipulated. To return to a form, search for it in Google Drive or visit https://docs.google.com/forms.

I hope this Google Forms tutorial was useful. For more information, check out the updated version of Google Drive & Docs In 30 Minutes.

How to convert multiple Google Docs files to Microsoft Word .docx

By Video

Here’s the situation: You write all of your reports, letters, invoices, and fiction masterpieces in Google Docs. There are scores of Docs files in your account, but now you need to convert the Google Docs documents to Microsoft Word .docx. Why? Maybe you want to apply special formatting to the files (Microsoft Word is far better than Docs when it comes to formatting). Or you need to share them with someone else who doesn’t use Google Docs, but does have MS Word. Here’s how to handle the conversion of multiple Google Docs files at once, without opening the files and converting them one by one.

The method basically involves selecting (but not opening) multiple Google Docs files in Google Drive, and then using the “download” option, which auto-converts them to MS Word .docx. The following video shows how to do it:

For more information, tips, and tricks related to Google Drive and Google Docs, check out my book!

Google Docs: new document creation explained

By Video
Google Docs new document creation explained

Google Docs: how to create a new document

Last month, I demonstrated the new Google Docs interface for the Web. This month we’re going to take a look at one of the most common actions in Google Docs — how to create a new document. There are a few ways to do it. The post below describes Google Docs new document creation in a browser (Chrome) or an iOS/Android mobile device. There is a also a short video that shows how to create a new document in Google Docs.

Windows/Mac/Chromebook

  1. Open drive.google.com and log on.
  2. From the Google Drive main screen: Click the New button on the left side of the screen. You will see different formats to choose from. Pick Google Docs.
  3. From the Google Docs main screen: Click the “+” icon.
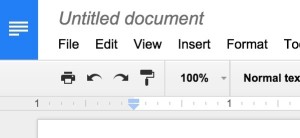
  4. A blank document will appear (see screenshot). You can start typing right away.
  5. To change the name of the document, click the default “untitled” name at the top of the screen.

The document is now ready for you to add text, pictures and other elements. You can type some text to get started. There is no “save” function—Docs auto-saves as you type.

To close the document and return to the Google Docs home screen, tap the blue icon with white lines in the upper left corner.

Android/iOS

  1. Open the Google Docs app.
  2. Click the large “+” icon.
  3. Enter a name for the document.

You can now begin typing or adding other elements to the file. To close the document and return to the Google Docs home screen, tap the blue icon in the upper left corner of the screen.

Google Docs new document creation video

The following video demonstrates how to create a new document in Google Docs. There are two easy ways to do it. This 2-minute video shows how:

Google Docs icons explained

By Blog, Video

Google Docs has a new stripped-down interface. It may look modern, but it can also be puzzling to people who are new to Google Docs and Silicon Valley software design standards. What do all of the icons do, how can users find what they are looking for, and how is the Google Docs interface different than Google Drive? The following short video explains it all in just 4 minutes:

Topics include:

  • Main menu
  • New document
  • More actions icon
  • AZ/Sort options
  • List vs. grid view
  • File picker
  • How the Docs interface differs from Drive