I recently tried out the new Google Forms while writing an update to Google Drive & Docs In 30 Minutes. The new interface is a lot slicker than the old version of Google Forms, and gives more control over the look and feel of the forms. It’s a great way to create an online survey, or have people enter data for a variety of purposes. It’s also worth noting that Google Forms has been partially decoupled from Google Sheets, meaning it’s possible to create a form directly from Google Drive and see the results within Google Forms, instead of having to open up Google Sheets. This post will show what the new Google Forms interface looks like, and then give a brief Google Forms tutorial.
Google Forms is a tool to build online forms, which can then be emailed, shared on social media, or embedded on a public-facing website. The forms can really change the way you gather data. Think about it: Instead of manually entering data, you can make a simple form or survey, post it on the Web and let other people do the work for you! This tool is perfect for signup forms, surveys, and simple reporting.
Once a form has been created, it can be accessed via a Google link that you can email or post on a social network. The form can also be embedded on a blog or company Web page. Customization options can make the form look more professional, or match the fonts and colors you want to use. The data from the form is only visible to you and designated collaborators (as described in ).
The Google Forms tutorial below applies to the updated interface for creating new forms, which was rolled out in late 2015 and early 2016 for some users. I expect it will be rolled out to most Google Drive and Docs users later in 2016.
How to create a form
- You can either use an existing spreadsheet (select Tools > Create a form) or make a new form from Google Drive’s main screen by pressing the New button and selecting More > Google Forms.
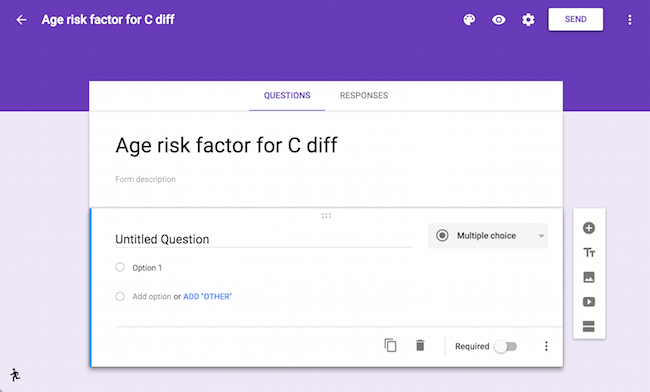
- The form editor appears (see screenshot, below).
- Enter the title.
- Enter the description. Make it clear what the form is being used for, and add any instructions that can help people complete the form. Absent context or appropriate instructions, users may be reluctant to use the form, or they may enter the wrong type of data.
- Edit the first untitled question. Change the name of the question by clicking on the title. Change option labels by clicking on them. Select different question types from the drop-down menu labelled Multiple choice. Select Required to force users to answer a question.
- Add a new question using the Add question There are more than a half-dozen types of questions that can be used.
- Short answer. A one-line text field.
- Paragraph. Allows for longer answers.
- Multiple choice. Create a multiple-choice question, with as many possible answers as you want.
- Checkboxes. People can check off one or more items from a list.
- Dropdown. Creates a drop-down menu.
- Linear scale. Users choose from a range of numbers.
- Multiple choice grid. Users fill in data according to a table.
- Date or Time. Users can select the date or time (useful for scheduling purposes).

The form builder has additional functions:
- Icons allow form creators to add titles, sections, photos, and video.
- Change the colors used in the form by clicking the easel icon.
- Preview the form by clicking the eye icon.
- The settings icon (look for the gear) controls who can use the form, as well as presentation options. Use the drop-down menu to select Anyone or one of the other options, if available.
When complete, click the Send button, which shows various distribution options. Email is the default choice, but social media icons, Web links, and embed code (which can be used to insert the form into a blog post) are other possibilities.
Data entered into the Web form can be accessed via the Responses tab at the top of the form editor. Click the Sheets icon to flow the data into a new or existing spreadsheet, which can then be formatted, sorted, filtered and otherwise manipulated. To return to a form, search for it in Google Drive or visit https://docs.google.com/forms.
I hope this Google Forms tutorial was useful. For more information, check out the updated version of Google Drive & Docs In 30 Minutes.