
Using a Bluetooth keyboard with the Google Docs mobile app

By Blog

If the virtual keyboard on your phone is difficult to use with the Google Docs mobile app, and you don’t want to use voice-to-text dictation features of Android or iOS, you have the option of pairing a Bluetooth keyboard to your phone.

Bluetooth is a short-range wireless technology that lets people wirelessly connect their phones to other computers or accessories. Bluetooth keyboards are inexpensive and lightweight, and can easily fit into a briefcase or small backpack. For the Google Docs mobile app on an iPhone or Android phone, serious typing is only possible with a bluetooth keyboard.

After turning on Bluetooth on your Phone (via Settings > Bluetooth) and charging the keyboard, follow the manufacturer’s instructions to pair it to your phone using a special on-screen code. This only needs to be done once; afterwards the phone will automatically detect the keyboard as long as the phone’s Bluetooth is activated and the keyboard has power. The following video shows how to pair a bluetooth keyboard to an iPad running a recent version of iOS:

You can then use the keyboard to type email or use other applications, including productivity apps such as Microsoft Word, Google Docs, PowerPoint, and more. I have heard of students who can’t afford a computer using their phone and a Bluetooth keyboard to complete reports and other homework assignments using Google Docs!

Typing and text tricks with the mobile Google apps on an iPhone

By Blog

If you have never owned a touch-screen device, entering text into the Google mobile apps (including Google Docs for iOS) will seem strange at first. Instead of a tiny physical keyboard (like the BlackBerry) letters and words are entered on the iPhone’s screen using a tiny virtual keyboard. The touch screen can also be used to select, copy, and paste.

Step-by-step instructions on how to use these features are shown below. Once you get the hang of it, the touch screen will seem like second nature.

How to use the iPhone’s virtual keyboard

Tapping your finger in any area that allows text input (including the cells in Google Sheets, the composition field in Google Docs, or the name field on any of the iOS apps) brings up a virtual keyboard, which covers the bottom third of the screen.

If you have never used a touch screen keyboard before, it will be awkward at first. To type a single letter, a light tap is all it takes. As you type the letter, a tiny square displays the letter being typed right above the key. This is a visual confirmation that you are typing the correct key.

Other keyboard functions include:

  • Deleting a letter. Press the gray Delete button on the right side of the keyboard.
  • Make a letter uppercase. Tap the shift key (upward-pointing arrow highlighted in the image below) once and then tap the letter.
  • Tap the shift button once. It will change from gray to white, and the letters will change from lowercase to uppercase.
  • Shift-lock. Double-tap the shift key. It turns white, and the arrow is underlined. Tap it again to switch back to lowercase mode.
  • Add basic punctuation or numbers. Tap the “123” key once, which brings up the numbers keyboard (see screenshot, above).
  • Add advanced punctuation and numerical operators. From the numbers keyboard, tap the “#+=” button.
  • Emoji and international keyboards. Tap the globe or emoji icon next to the space bar.

How to place the cursor to add or delete text

To place a cursor on another part of the screen (for instance, to add or delete text in the middle of the sentence) follow these instructions:

  1. Hold your finger on the place on the screen where you want to place the cursor.
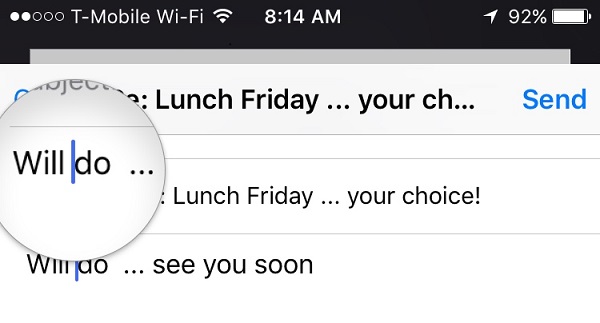
  2. A magnifying glass appears under your finger, showing the text and the placement of the cursor (see image, below). Move your finger down slightly to get a better view, but don’t let go.
  3. Move to the left or right to move the cursor.
  4. When the cursor is placed where you want it, lift your finger.
  5. Add or delete text as needed using the keyboard.

iPhone typing and text tips

How to copy and paste text

It is also possible to select a word or phrase. Tap and briefly hold a word. The word will be highlighted, with two handles on either side and a menu above:

  • Pull the handles to increase the size of the highlighted text, or select All.
  • Copy or cut the text (you can paste it somewhere else later by double-​tapping where you want to insert the text).
  • Tap the arrow to see other options, which may include formatting and inserting photos into emails.

Google Cloud Print and wired printers

By Blog

It’s possible to attach a wired printer to Google Cloud Print. Why would you want to do this, considering a PC or laptop can send print jobs directly to the printer, without Google Cloud Print?

The answer: Other laptops, PCs, and mobile devices on the same network will be able to wirelessly print Google Docs, Sheets, and Slides files. It’s a cool feature, albeit one that requires extra setup steps to make it work.

Here are the instructions for enabling a wired printer to be used with Google Cloud Print services:

  1. Make sure the wired printer is turned on and connected to the PC or laptop you are using with a USB cable.
  2. Launch Google Chrome, and click the More actions icon (three dots in the upper right corner of the browser window).
  3. Click Settings, then Advanced.
  4. Scroll down to Google Cloud Print and select it.
  5. Select Manage Cloud Print Devices.
  6. Under Classic Printers, click Add Printers.
  7. Select from available devices.

Once Google Cloud Print is enabled for a wired printer attached to a PC or a laptop, the printer will not need to be configured for other computers and devices connected to the same wireless network.

How to delete Google Drive (desktop application or mobile app)

By Blog

People typically delete Google Drive applications for one of the following reasons:

  • They aren’t using it (or prefer to use Google Drive in a browser)
  • There are issues with syncing files, especially if large files or folders are regularly updated.
  • The computer is about to be sold or transferred to a new owner or user.

Steps to uninstall Google Drive are covered below. Note that files may still be left on your computer or device even after Drive has been removed. To disconnect the new Google Drive Backup & Sync application, follow these steps.

Removing the Google Drive application from a desktop or laptop

If you want to remove the Google Drive application from your computer, follow these steps:

  1. Click the Google Drive icon in the System Tray (Windows) or Menu Bar (OS X) and select Preferences.
  2. Select Account.
  3. Press Disconnect Account

Then follow these steps:

PC

  1. Press Start > Control Panel.
  2. Select Programs > Programs and Features.
  3. Select Google Drive

Mac

  1. If the Google Drive icon is still visible in the Menu Bar, click it and select Quit.
  2. Open the Applications folder and drag the Google Drive application to the trash.
  3. Removing the Google Drive application will not remove files or folders. Those will have to be deleted separately.

Removing the Google Drive app from mobile devices

To delete the Google Drive app from a phone or tablet, follow these steps:

Android

  1. Open Google Play or the Play Store app.
  2. Press the Menu icon (three horizontal bars) and select My Apps.
  3. Under Installed, select Google Drive.
  4. Press Uninstall

iOS

  1. Hold down the Google Drive app icon until it begins to wiggle.
  2. Press the “x” to delete it.

Files that have been downloaded to the device from Google Drive will not be automatically deleted from the device. In addition, uninstalling Google Drive will not impact the operation of the Google Docs, Sheets, and Slides apps.

How to create links to Google Docs files

By Blog, Video

If you do a lot of work in Google Docs, there are times when you may want to create links to Google Docs files so other people can view or edit them. Sharing public links in Google Docs is easy to do, but the menu is buried and some of the options can be a little confusing. In addition, sometimes you may want to add restrictions to limit who can view the Google Docs file or who is allowed to edit the file. These are important considerations if you are collaborating using Google Drive or Google Docs.

The following 3-minute video explains how link sharing works for Google Docs. It covers both public links (viewable by anyone) as well as private links (limited to people you contact or people in your company):

How to embed Google Forms on WordPress or other sites

By Video

In recent months, I have talked about how to create a Google Form and how to change the design. If you use Google Forms to make surveys, scheduling forms, or other online data-entry pages, you may prefer to simply email the Google Forms URL to users or post it on social media. However, there is another way to use Google Forms, that lets you embed Google Forms on WordPress or another type of website. It can be used for all kinds of websites, including corporate websites and WordPress blogs.

There are several advantages of embedding a Google Form on your own website:

  1. The web browser will show your web domain (e.g., in30minutes.com) instead of the Google Forms URL.
  2. You can leverage the branding you may have on the website, such as logos or links to other resources.
  3. Other people may be more likely to use the form if it comes from a trusted source, such as your business URL or an official brand URL.

In order to embed the form on a website, the website will need to allow HTML to be added to a specific page, and you (or someone who has access to the content management system of the website) has the ability to add a line of computer code. This is important, because not all websites allow such access, or you may not know how to do this. However, if you manage your own website or blog, and you are comfortable with copying and pasting, it’s not hard to place Google Forms on WordPress or another type of website.. The following short video shows how, using a WordPress business website as an example.

How to prevent messages from going to the Gmail spam folder

By Video

If you are one of the hundreds of millions of people who use Gmail every day, you may be wondering how to stop messages from certain people or organizations being flagged as spam and placed in the Gmail spam folder. It happens to me all of the time, sometimes with important messages from friends or colleagues or business partners. Even if you use Gmail’s “not spam” button, sometimes the messages are still flagged as spam (false positives) and end up in the Gmail spam folder. After a certain period of time, the messages are automatically deleted — sometimes without you ever knowing they were there!

The video below shows how to stop gmail from flagging spam for email addresses that you choose. In other words, these messages won’t end up in the Gmail spam folder. The video is short, just a few minutes long, and the technique works with the standard consumer version of Gmail as well as the G Suite/Google Apps flavor of Gmail.

Google Forms new interface and tutorial

How to make a form using the new Google Forms

By Video

I always thought that Google Forms was one of the great, hidden features of the Google Drive/Google Docs suite. Not only did it let users quickly create an online survey form that could be sent to people or inserted into a webpage, the responses were automatically fed back into Google Sheets for sorting and other actions. I wasn’t the only one who was impressed; soon enough I began to see all kinds of other uses of Google Forms, from small businesses setting up appointments to online surveys for startups researching market trends.

Now there is a new Google Forms interface. It is superior to the old interface, looks better, and allows for quicker form creation and data review. As before, Google Forms is free, and in that sense provides a great alternative to Survey Monkey, which locks up some features behind a paywall. While Microsoft’s free online spreadsheet program Excel Online offers a new form creation tool, the interface is positively primitive compared to Google Forms.
Google Forms interface and tutorial

In the short video below I won’t get into all of the details of the new Google Forms interface, but it shows how to set up a basic form. I have also created another video that shows how to change the design of Google Forms.