Category

Blog

How to use the Google Docs mobile app to edit MS Word .docx files

By Blog, Video

The Google Docs mobile app for Android and iOS now has the ability to edit Microsoft Word .docx files on the go! The following three-minute video shows how it works, using an actual .docx file stored in a Google Drive account and accessed through the Google Docs mobile app for iOS. Note that editing and formatting tools are limited, but at least it gives users a quick way to access and edit Microsoft Word documents when there is no easy access to a desktop computer or laptop.

To see how to edit a .docx file in Google Docs on a PC, Mac, or Chromebook, see our recent posts on this topic.

Edit .docx files in Google Docs using Office Compatibility Mode

By Blog, Video

So you have a .docx file, and you want to edit it. A few years ago, you would have needed Microsoft Word to open and edit the file, or you would need to use a workaround, such as uploading the .docx file to Google Drive and converting it to Google Docs for editing. Now, it’s possible to use Google Docs to edit the original .docx file in Google Docs using Office Compatibility Mode–no conversion required!

The following video shows how it works. Keep in mind that editing options for MS Word .docx files in Google Docs are limited to formatting, such as bolding or italicizing text, applying different fonts, aligning text, and adding bullet lists. Advanced Word features involving inserting photos and tables or tracking changes are not supported in Google Docs (at least not yet). The video is less than four minutes long, and if you need more information, I have written about the pros and cons of Office Compatibility Mode in Google Drive.

Google Docs printing basics (and troubleshooting)

By Blog, Video

So you are finally using Google Docs as your primary word processing program, and now you need to print out a document. The following short video covers Google Docs printing basics as well as common problems and how to troubleshoot them. Topics include printer setup, saving to PDF, getting rid of unwanted header information, setting orientation (portrait vs. landscape) and other basic information about Google Docs printing issues.

How to restore a deleted file in Google Drive

By Blog, Video

It’s a pretty common scenario to have to restore a deleted file in Google Drive. Perhaps you deleted the file in error, or you trashed it and discovered later that you need to access it once more. The following method to restore a deleted file in Google Drive is not failsafe, but in many cases it will allow you to quickly bring it back to life. Note that this method works for native Google files (such as documents created in Google Docs, presentations created in Google Slides, spreadsheets created in Google Sheets, etc.) as well as files that were created by other applications or devices–photos, Microsoft Word documents, text files, PDFs, etc.

The video is less than two minutes long:

Google Forms tutorial using the new forms interface

By Blog

I recently tried out the new Google Forms while writing an update to Google Drive & Docs In 30 Minutes. The new interface is a lot slicker than the old version of Google Forms, and gives more control over the look and feel of the forms. It’s a great way to create an online survey, or have people enter data for a variety of purposes. It’s also worth noting that Google Forms has been partially decoupled from Google Sheets, meaning it’s possible to create a form directly from Google Drive and see the results within Google Forms, instead of having to open up Google Sheets. This post will show what the new Google Forms interface looks like, and then give a brief Google Forms tutorial.

Google Forms is a tool to build online forms, which can then be emailed, shared on social media, or embedded on a public-facing website. The forms can really change the way you gather data. Think about it: Instead of manually entering data, you can make a simple form or survey, post it on the Web and let other people do the work for you! This tool is perfect for signup forms, surveys, and simple reporting.

Once a form has been created, it can be accessed via a Google link that you can email or post on a social network. The form can also be embedded on a blog or company Web page. Customization options can make the form look more professional, or match the fonts and colors you want to use. The data from the form is only visible to you and designated collaborators (as described in ).

The Google Forms tutorial below applies to the updated interface for creating new forms, which was rolled out in late 2015 and early 2016 for some users. I expect it will be rolled out to most Google Drive and Docs users later in 2016.

How to create a form

  1. You can either use an existing spreadsheet (select Tools > Create a form) or make a new form from Google Drive’s main screen by pressing the New button and selecting More > Google Forms.
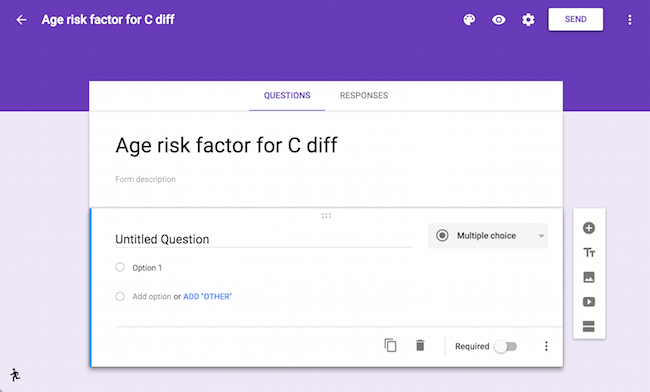
  2. The form editor appears (see screenshot, below).
  3. Enter the title.
  4. Enter the description. Make it clear what the form is being used for, and add any instructions that can help people complete the form. Absent context or appropriate instructions, users may be reluctant to use the form, or they may enter the wrong type of data.
  5. Edit the first untitled question. Change the name of the question by clicking on the title. Change option labels by clicking on them. Select different question types from the drop-down menu labelled Multiple choice. Select Required to force users to answer a question.
  6. Add a new question using the Add question There are more than a half-dozen types of questions that can be used.
  • Short answer. A one-line text field.
  • Paragraph. Allows for longer answers.
  • Multiple choice. Create a multiple-choice question, with as many possible answers as you want.
  • Checkboxes. People can check off one or more items from a list.
  • Dropdown. Creates a drop-down menu.
  • Linear scale. Users choose from a range of numbers.
  • Multiple choice grid. Users fill in data according to a table.
  • Date or Time. Users can select the date or time (useful for scheduling purposes).

Google Forms tutorial based on the new Google Forms interface

The form builder has additional functions:

  • Icons allow form creators to add titles, sections, photos, and video.
  • Change the colors used in the form by clicking the easel icon.
  • Preview the form by clicking the eye icon.
  • The settings icon (look for the gear) controls who can use the form, as well as presentation options. Use the drop-down menu to select Anyone or one of the other options, if available.

When complete, click the Send button, which shows various distribution options. Email is the default choice, but social media icons, Web links, and embed code (which can be used to insert the form into a blog post) are other possibilities.

Data entered into the Web form can be accessed via the Responses tab at the top of the form editor. Click the Sheets icon to flow the data into a new or existing spreadsheet, which can then be formatted, sorted, filtered and otherwise manipulated. To return to a form, search for it in Google Drive or visit https://docs.google.com/forms.

I hope this Google Forms tutorial was useful. For more information, check out the updated version of Google Drive & Docs In 30 Minutes.

Managing Google Drive files on Chromebooks with limited storage

By Blog

A reader of Google Drive & Docs In 30 Minutes recently wrote in with the following question about managing Google Drive on a Chromebook with limited storage space:

“When using Google Docs with offline sync is it possible to select where the files should be stored?  There is little memory available in a Chromebook so I use a thumb-drive to store stuff and thought it would be a great place to store offline documents – but how to I tell the computer to store it there?”

It is possible the default “save” location for all files, using this method:

To set a default location for your saved files:

  1. Click the status area, where your account picture appears.
  2. Select Settings Settings icon > Show advanced settings.
  3. In the “Downloads” section, pick a default download location by clicking Change.

However, I do not believe it is currently possible to change the default location of a Chromebook’s Drive Files folder for offline syncing.  Following is an explanation of how Drive handles a lack of storage space on Chromebooks … it apparently removes older files that have not been accessed in a while:

Open the File Manager app.
  1. Click on the Downloads folder > 3 dot menu > how much space is left on your local SSD.
  2. Click on My Drive > 3 dot menu > how much space is left in your online storage.
Drive offline syncs up to 5GB or 100 files. It will start automatically removing the oldest modified files from the local SSD when you get to that number.This is the only way you can selectively sync and choose non Google Docs, Sheets etc. Files like jpeg, png or PDF files or some other format via the right click context menu.
 
This is how is works at the moment. The way to avoid the syncing for offline is to always work in the Drive app or drive.google.com. and only open the ones you want offline in the Drive folder in the File Manager app.
Most chromebooks have 16GB – about 7GB for Chrome OS = 9GB – extensions/apps – cache – files in local Downloads – offline capable app files like Keep or offline Gmail.
If your Chromebook is running out of local storage space, you either have a lot of files in the Downloads folder or have other User Accounts also using local disk space.

It’s probably not the answer the reader wanted to hear, but in this case I think it is difficult to work around the inherent limitations of the Chromebook platform (i.e., tight integration with Google Drive/Docs/Sheets/Slides and a lack of internal storage to keep Chromebooks cheap & help them live up to the promise of cloud storage).

One thing I added when I responded to the reader: Keep in mind that even if a file is removed from the Chromebook, it will still be available on drive.google.com.

Converting .docx files to Google Docs, and preserving Drive storage space

By Blog
A reader recently contacted me to ask about file conversion and use of storage space in Google Drive. She wrote:
“I purchased your Google Drive book today and consider it a solid foundation to begin, thanks! I am new to freelancing and two of my clients use Google Drive so trying to get up to speed ASAP.
I am hoping you can answer one of the questions that I am most interested in – is there a way to convert a word doc with ext .docx into a Google doc and not use up storage space? I.e. if I copy text from a word doc and paste into a new Google doc is that considered a Google doc file and therefore doesn’t use any storage space? I’d like to eliminate a number of word documents on my laptop and transfer to my Drive so can easily share with clients, but would prefer not to use up storage space.”
The answer: Any Google Doc created by a user through any means (copy and paste, or the “open as” feature) will not count toward that user’s Google Drive storage limit.
However, if the user uploads and converts a .docx file, he or she should delete the original .docx file after creating the Google Docs version because the original Word file will count toward the storage limit. For people using the free Google Drive/Docs accounts, this is a big deal.
However, there is one other major consideration before doing any large-scale conversion of MS Word files to Google Docs: If the original .docx files have complex formatting (for instance, a newsletter or a document with complex headers or footers), Google Docs will strip out most of the formatting or convert it to something that looks quite different than the original. This is an issue I discussed in my book, and used an example of a fancy Word template that was completely gutted during the Google Docs conversion process. Standard reports, letters, and drafts generally come through OK, though.
Also, in my opinion it’s worth paying a little extra to get more storage space and other features. I do it through a Google Apps subscription, which allows me to use my own email address plus a bunch of email aliases and more Google Drive storage than I know what to do with (90 GB in all). It’s worth the $5/month, plus I get a little more attention when I need Google Drive support (that is, an actual human being looks into issues when they come up).

Google Docs icons explained

By Blog, Video

Google Docs has a new stripped-down interface. It may look modern, but it can also be puzzling to people who are new to Google Docs and Silicon Valley software design standards. What do all of the icons do, how can users find what they are looking for, and how is the Google Docs interface different than Google Drive? The following short video explains it all in just 4 minutes:

Topics include:

  • Main menu
  • New document
  • More actions icon
  • AZ/Sort options
  • List vs. grid view
  • File picker
  • How the Docs interface differs from Drive

Google Docs and publishing to the Web

By Blog

This option is something you won’t find in Microsoft Word, Apple Pages, or other desktop word processors. Google Docs lets you publish a live copy of the document to a Google URL. The Web copy looks similar to the view that you see in Google Docs, but it can’t be edited. It lets you share documents on your social networks (personal or professional) or post something to a blog for readers to see.

While Web publishing is not currently supported on the Google Docs app for Android and iOS, it’s easy to publish a document to the Web using the browser and chromebook versions of Google Docs. Here’s how:

  1. Open the document.
  2. Go to File > Publish to Web.
  3. Link is selected by default, but if you want HTML code to display the document on a blog or another Web page, choose Embed.
  4. Use the optional Published content & settings to restrict the viewership or disable republishing when changes are made.
  5. Click the Publish button.
  6. Copy the link or embed code, and/or choose one of the options to share the document via Gmail, Facebook, or Twitter.

The Web copy will be updated if you or a collaborator update the original in Google Drive. Note that page numbers, line spacing, and other formatting may be changed or stripped out. Nevertheless, publishing to the Web is a great way to share content on Google Docs with a wider audience.

Note: publishing to the Web makes the document available to anyone who has a copy of the URL, so this option should not be used for sensitive documents.

Google docs publish to web

This is an excerpt from Google Drive & Docs In 30 Minutes (2nd Edition): The unofficial guide to the new Google Drive, Docs, Sheets & Slides. To download the ebook or purchase the paperback edition, please refer to the links on this page.

Google’s Office Compatibility Mode: Pros and Cons

By Blog

Users can edit Microsoft Word, Excel, and PowerPoint files in Google Docs, Sheets, and Slides using Google’s Office Compatibility Mode. This is a great feature that may save you the hassle of converting between Microsoft formats and the equivalent Google program — for instance, it may no longer be necessary to convert a Microsoft Word .docx file to Google Docs, make edits, and then convert the Google Docs file back to .docx.

Office Compatibility Mode comes built into Chromebooks and the mobile apps for Android and iOS, and can be activated on the Chrome browser on PCs and Macs (go to Window > Extensions, search for Office Editing for Docs, Sheets & Slides and install).

However, there are some limitations:

  • Office Compatibility Mode will not work with Internet Explorer, Firefox, Safari, or other browsers.
  • Files with the .doc, .docx, .xls, .xlsx, .ppt, and .pptx extensions can be edited if they were created in Microsoft Office 2007 or newer versions of Microsoft Office. Older files (created in Microsoft Office 2003 and earlier) are not supported unless they are resaved with a more recent version of Microsoft Office.
  • It may not be possible to edit large documents, especially large Excel spreadsheets.

Converting Microsoft formats for collaboration

Collaborative editing (described in Chapter 6 of Google Drive & Docs In 30 Minutes) is not possible when Microsoft Office files are opened for editing. However, it is possible to convert Office files to the equivalent Google formats for collaborative editing (see screenshot, below). Conversion can take place automatically during the upload process. Alternately, you can select the uploaded file in Drive and use one of the following methods to convert it:

  • Right-click over the selected file and choose Open with.
  • Click the More Actions icon (which looks like three vertical dots) at the top of the screen and select the option to open it in Google Docs/Sheets/Slides.
  • Preview the file, then select the Open with option

Google Drive Office Compatibility mode vs. collaborative editing