Tag

tutorial

Google Sheets: How to make a pie chart

By Blog, Video

In the following quick video, learn how to make a pie chart in Google Sheets, using the new interface released in 2015. This covers the basics of creating a pie chart, but the instructions apply to bar charts, line charts, etc. It assumes the data used to create the chart is valid — for instance, if it’s a pie chart the values should add up to 100.

The video is just two minutes long, and starts below:

For more tips about Google Sheets, including conversion between Microsoft Excel and CSV formats, and how to use the Sheets app for iOS and Android devices, check out Chapter 3 of Google Drive & Docs In 30 Minutes.

How to format cells in Google Sheets

By Uncategorized

The following video covers formatting basics in Google Sheets, using the Google Sheets toolbar. Bold, text color, fill color, and other options are demonstrated. The instructions apply to the new version of Google Sheets on a PC, Mac, or Chromebook:

Note that formatting options are far more limited on the Google Sheets app for iPhones, iPads, and Android devices.

For more tips and tricks about Sheets, check out the latest edition of my guide, Google Drive & Docs In 30 Minutes.

How to permanently delete a file in Google Drive or Docs

By Blog

How to permanently delete a file or folder in Google Docs, Google Sheets, Google Slides, or Google Drive, using the new Google Drive interface released in 2015. While most people think that clicking the trash can icon for a selected file or folder in Google Drive will remove it for good, that’s not the case — it still exists in a sort of holding pen. The following two-minute video explains how to permanently delete a file or folder in Google Drive:

For more tips and tricks on how to get the most out of Google Drive, check out Google Drive & Docs In 30 Minutes, 2nd Edition.

Google Docs: How to add an image from the Internet

By Blog

This three-minute video shows how to add an image from the Internet to a Google Docs file, using a URL of an image from the World Wide Web. This is useful if you see an image on the Web that you want to include in a report, letter, or other document you are writing in Google Docs. Of course, only use the image if you have permission, or it’s marked with the appropriate Creative Commons or Public Domain license.

Without further ado, the video:

For more tips and tricks that can show you how to get the most out of Google Docs, check out my book, Google Drive & Docs In 30 Minutes.

How to convert a text file to a PDF using Google Docs

By Blog

This short video explains how to convert a text file (.txt) to a PDF using Google Docs. It’s quick, and the conversion process adds a few extra benefits that aren’t found in other text-to-PDF converters. The three minute video explains how:

Why would you want to convert a text file to a PDF? Perhaps it’s because you want someone else to see it, but you don’t want them to edit it. Or maybe you want to post it to the Web, Scribd, or some other online service.

For more tips about Google Docs, check out the latest edition of my guide, Google Drive & Docs In 30 Minutes, 2nd Edition.

How to restore a deleted file in the new Google Drive

By Blog

Learn how to restore a deleted file or folder, using the new Google Drive interface released in 2015. Because Google Drive doesn’t delete selected files or folders when you “remove” them using the trash can icon in the Google Drive toolbar, you can restore them. This means that old project folder or a Google docs file you mistakenly trashed can be recovered as long as you haven’t emptied the trash. The video below explains how it works:

This video is less than 2 minutes long. For more tips and tricks on how to get the most out of Google Drive, check out Google Drive & Docs In 30 Minutes, 2nd edition.

Google Sheets: How to embed a live spreadsheet

By Blog

Recently, I published Sample spreadsheet: AutoFill on the official Excel Basics In 30 Minutes website. In addition to including a sample Excel .xlsx file, I also embedded a live version of the same spreadsheet that people can edit and play with, right on the blog post. This post explains how to embed a live spreadsheet using Google Sheets, the free online spreadsheet program offered by Google. It involves a small hack, which I will describe below.

While Google Sheet’s Share button makes it easy to share a link to a spreadsheet, and allows the owner of the spreadsheet to enable anyone to edit it, editing is not possible if the embed option is chosen for the File>Publish to the Web feature.

That is, when you embed the spreadsheet on a blog post or Web page, you won’t be able to edit or format the cells, or create formulas. For example, here is an embedded spreadsheet. Notice you can highlight cells, but can’t input or change information, or use any other features of Sheets:
Google Sheets how to embed a live spreadsheet that can be edited

But there’s a workaround. Follow these steps:

  1. Open the spreadsheet, and select _File>Publish to the Web
  2. In the Publish to the Web popup, press the Start publishing button
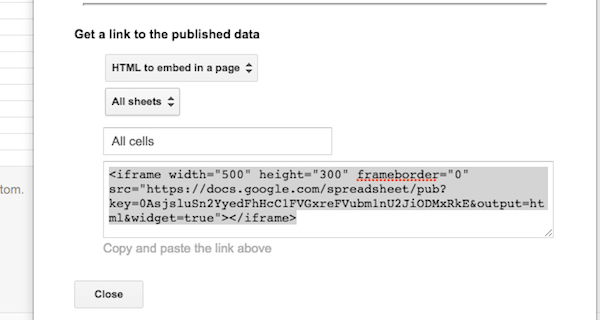
  3. Under Get a link to the published data, change Web page to HTML to embed in a page
  4. Copy the embed code, which will look something like this:

After copying the text (Edit>Copy) and pressing the Close button, paste the embed code into a text editor or the blog editor (make sure the raw code or HTML view is showing). At this point if you publish the page, the sheet will be viewable but not editable. Follow these steps to enable live editing of the spreadsheet on the page:

  1. Go back to the spreadsheet in Google Sheets, and press the Share button
  2. In the Share with others popup, click Advanced
  3. Under Who has access, click the Change link and select On: Anyone with link
  4. At the bottom of the Who has access popup, change the Can view drop-down to Can edit and click Save
  5. The Sharing settings popup will appear. Copy the Link to share and close the popup

Now what needs to happen is most of the URL in the iframe embed code needs to be deleted, and replaced with the link you’ve just copied from the Sharing settings popup. Basically, delete everything in the quotation marks after src= starting with https:// but leave &widget=true. Then, paste in the other URL before the ampersand. I’ve highlighted the part of the iframe code that needs to be replaced:

iFrame Google Sheets URL

At that point, once you’ve published the page, the live spreadsheet will not only be visible, but it will also be editable. To see an example, visit this page on the official Excel Basics In 30 Minutes website.

If this tutorial has been helpful, please consider tweeting or sharing it elsewhere.