Recently, I published Sample spreadsheet: AutoFill on the official Excel Basics In 30 Minutes website. In addition to including a sample Excel .xlsx file, I also embedded a live version of the same spreadsheet that people can edit and play with, right on the blog post. This post explains how to embed a live spreadsheet using Google Sheets, the free online spreadsheet program offered by Google. It involves a small hack, which I will describe below.
While Google Sheet’s Share button makes it easy to share a link to a spreadsheet, and allows the owner of the spreadsheet to enable anyone to edit it, editing is not possible if the embed option is chosen for the File>Publish to the Web feature.
That is, when you embed the spreadsheet on a blog post or Web page, you won’t be able to edit or format the cells, or create formulas. For example, here is an embedded spreadsheet. Notice you can highlight cells, but can’t input or change information, or use any other features of Sheets:
But there’s a workaround. Follow these steps:
- Open the spreadsheet, and select _File>Publish to the Web
- In the Publish to the Web popup, press the Start publishing button
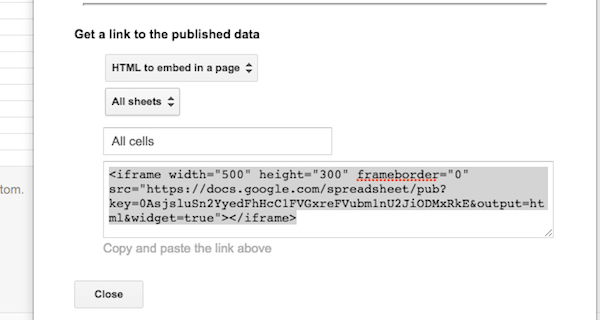
- Under Get a link to the published data, change Web page to HTML to embed in a page
- Copy the embed code, which will look something like this:
After copying the text (Edit>Copy) and pressing the Close button, paste the embed code into a text editor or the blog editor (make sure the raw code or HTML view is showing). At this point if you publish the page, the sheet will be viewable but not editable. Follow these steps to enable live editing of the spreadsheet on the page:
- Go back to the spreadsheet in Google Sheets, and press the Share button
- In the Share with others popup, click Advanced
- Under Who has access, click the Change link and select On: Anyone with link
- At the bottom of the Who has access popup, change the Can view drop-down to Can edit and click Save
- The Sharing settings popup will appear. Copy the Link to share and close the popup
Now what needs to happen is most of the URL in the iframe embed code needs to be deleted, and replaced with the link you’ve just copied from the Sharing settings popup. Basically, delete everything in the quotation marks after src= starting with https:// but leave &widget=true. Then, paste in the other URL before the ampersand. I’ve highlighted the part of the iframe code that needs to be replaced:

At that point, once you’ve published the page, the live spreadsheet will not only be visible, but it will also be editable. To see an example, visit this page on the official Excel Basics In 30 Minutes website.
If this tutorial has been helpful, please consider tweeting or sharing it elsewhere.
Cool its working………….!!! THANK YOU SO MUCH
You’re welcome!
Ian Lamont, author, Google Drive & Docs In 30 Minutes
Does your method work with the new Google Sites, released a couple of weeks ago? I have been trying to make this work, but Google seems to have restricted this ability.
Felicia: I am not sure about Sites – as you noted it is more restrictive, possibly because it can be abused by spammers, scammers, and others.